

Do you want your Raspberry Pi to run several operating systems? Dual booting is required, and BerryBoot is one of the best programmes for the job.
In this post, I'll teach you how to use the BerryBoot programme to dual boot your Raspberry Pi, allowing you to install and utilise two (or more) operating systems on your Pi. In reality, you may use this application to multiboot many Raspberry Pi's.
Despite the fact that the Raspberry Pi Foundation provides an official utility called NOOBS, it lacks some functions that the BerryBoot can offer. So, are you ready to put the BerryBoot to the test and dual-boot your Raspberry Pi 3 or 4? So, without further ado, let's get started.
What is the purpose of BerryBoot?
BerryBoot is a programme that aids in the installation of one or more operating systems on your Raspberry Pi. This utility might also come in helpful if you're having trouble installing an ISO disc image of any OS.
Basically, BerryBoot allows you to pick an operating system from a list, download it, and install it without having to do any work. Once you've configured everything in the BerryBoot, you'll be able to pick your preferred operating system every time you boot your Raspberry Pi.
It also includes a few network utilities, a configuration editor, and location settings, among other things.
The configuration editor is a wonderful tool that comes in handy when you need to change network settings in wpa_supplicant.conf or boot menu timeout settings in cmdline.txt.
Also Check: How to Install an Operating System on a Raspberry Pi?
How to Set Up a Dual-Boot Raspberry Pi
Here are the procedures to dual-booting or multi-booting your Raspberry Pi with your preferred operating systems.
BerryBoot may be downloaded and copied to an SD card.
To begin, you must first obtain BerryBoot from an internet source [Download here]. A dedicated version is available if you have a Raspberry Pi 3, 4, or 400. As a result, be sure you download it.
Once the zip file has been successfully downloaded, unpack the contents and copy them to your SD card using your computer.
Coming Soon on #Kickstarter
— SB Components Ltd (@sb_ltd) January 11, 2022
𝟏.𝟓𝟒" 𝐚𝐧𝐝 𝟐.𝟕 𝐄-𝐏𝐚𝐩𝐞𝐫 𝐇𝐀𝐓 : 𝐄-𝐈𝐧𝐤 𝐃𝐢𝐬𝐩𝐥𝐚𝐲 𝐟𝐨𝐫 @Raspberry_Pi
SPI Interface | 3-wire SPI, 4-wire SPI | 3.3V Operating voltage | Low Power Consumption | Standard Raspberry Pi 40PIN GPIO https://t.co/VWKMQQpYHt pic.twitter.com/0EESiWoOyC
Make sure the files are copied to the SD card's root directory. It will not work if you change the location. Remove the sard securely after transferring all of the files to the correct spot. Don't just pull out of the port. Ensure that no background programmes that use the card are running.
Now you can power on your Pi by inserting the card into it. Before turning on the Pi, double-check that the mouse and keyboard are properly connected. This is necessary for the BerryBoot interface to pick operating systems.
Set up BerryBoot for Dual-Boot Raspberry Pi
On your display, the BerryBoot will offer you with a setup screen. On this first welcome screen, you will be asked to select a few choices for the visual and network connection. If you notice green borders at the top and bottom of your screen, select Yes (disable overscan) in the video setup. Otherwise, select No (enable overscan).
Select the type of network connection you're using in the network connection setup. Select Wired if you're using an ethernet connection. Otherwise, choose Wifi and enter the password after selecting your Wi-Fi name (SSID).
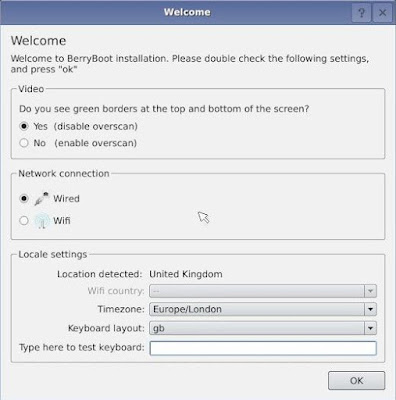
Choose your chosen Timezone and Keyboard layout in the last section of the Locale settings. This is to ensure that the BerryBoot can connect to the server and that OS systems may be downloaded without difficulty. When you're finished, click OK.
Install Dual-Boot Operating Systems on the Raspberry Pi
After you've completed the preceding procedures, you'll be given with a new window where you may choose where you want to install the operating systems.
You'll see the SD card (typically identified as mmcblk0) and any other media you have, such as NAS (Network storage), SSD (sda), and so on.
As a result, you must select the media for OS installation. If you need to format the media before installing it, choose Format and then Continue. The file system will be set to ext4 by default. Leave it alone.
Note: Formatting your SD card will wipe all of your data, so make a complete backup of your SD card before proceeding.
When you're done, BerryBoot will open another window with a list of operating systems. So look over the list and choose whatever OS you want to install.
You can only install one operating system at this moment. But don't worry: following a system reset, you may install various operating systems.
To install, select the first OS and then click OK. This will begin the download of the OS image file, which will then be copied to your SD card (or whatever media you have selected). Your system will reboot when the procedure is completed.
After the machine has rebooted, go to the boot menu and choose Edit. You may now install as many additional operating systems as you require. However, make sure the storage media isn't full. Always keep at least 10-15% free space on your storage to ensure that the installed OSes don't hang or cause other problems.
My advice is to limit yourself to two or three operating systems at a time.
Follow the procedures below to install a new operating system:
- To explore and select an OS, click Add OS.
- For the OSes you require, check the appropriate boxes.
- Click the OK button.
- Now choose the operating system you wish to use as your default.
- To download and install the OS, click Exit.
Wait for the installation to finish; this may take some time depending on your internet speed, operating system, and the number of OSes you have installed, among other factors.
Raspberry Pi with Dual Boot
On your Raspberry Pi, you've already setup and installed the dual boot operating systems in BerryBoot. The following step is to dual-boot the Raspberry Pi with those operating systems.
After your Raspberry Pi reboots, you'll be provided with a boot screen where you may select which operating system to boot. If you don't make a choice within 10 seconds, it will load the default OS that you selected previously. A keyboard or mouse is required to make a manual selection. So, before you turn on your Pi, make sure you have a keyboard, mouse, or both.
You may move to a different operating system at any moment once you've landed on one of the operating systems you installed. Simply restart your computer and pick the needed operating system from the boot menu.
BerryBoot's Advanced Options
As previously stated, BerryBoot has sophisticated features such as a configuration editor, boot timeout editor, cloning, and backup.
- You may use the Clone option to make a clone of any OS presently loaded on your Pi.
- The Backup option will assist you in creating a complete backup of any or all operating systems to a different storage medium.
- Uninstalling an operating system may be done with the Delete option.
- There are possibilities to alter files like cmdline.txt, config.txt, wpa supplicant.conf, and others if you go to the Advanced configuration settings.
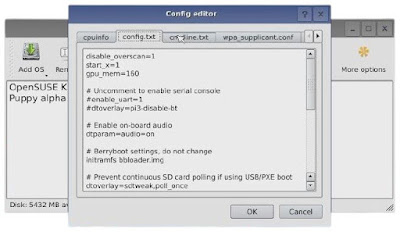
I'll teach you how to change the boot menu time-out settings in the cmdline.txt file, for example.
I'm altering the timeout in seconds inside the file.
bootmenutimeout=<number of seconds>
bootmenutimeout=12
Here, I've adjusted the default boot menu time-out settings from 10 seconds to 12 seconds. After 12 seconds of inactivity on the user's part, the default OS will be loaded.
Set password to secure instals, Repair filesystem, and more advanced options are available in BerryBoot.
Setting up dual boot on a Raspberry Pi is relatively difficult, but you must use caution when handling your Pi and storage media. I hope you now know how to multi boot a Raspberry Pi with the BerryBoot programme, and if you have any questions or suggestions, please leave a comment below. I'll get back to you as soon as possible.
Posts You May like:
- Enhance your Raspberry Pi with Audio - Audio Codec HAT
- The KiCad Project Announced Version 6.0.0. #KiCad @kicad_pcb
- LoRa HAT is Finally Out! Supports 915MHz | 868MHz | 433MHz
- How to Block Ads with Pi-hole on a Raspberry Pi Zero 2 W
- Uninterruptible Power Supply UPS HAT For Raspberry Pi
- A hidden speed boost and a 64-bit option are included in the new #RaspberryPi #OS
- Using the On-Board Bluetooth on the Raspberry Pi 4 for Communication
- #ArduinoIDE 2.0 Release Candidate (RC)
- Armbian Linux on the Raspberry Pi 4: A First Look
- NeoPixel Christmas Tree Lights Controlled by a Raspberry Pi
- What Type of LoRa Modules are Available?
- Introducing The VisionFive V1 is a RISC-V Based Raspberry Pi Replacement - Available Soon
- Raspberry Pi Zero 2 W Overclocking - Boost Up To 1.2GHz, or even 1.4GHz
- The Arduino UNO Mini Limited Edition is Now Available
- Scan QR Codes with Raspberry Pi Pico
- Create Barcodes with Pure Python
- The New Version of Raspberry Pi OS, Debian "Bullseye" is Now Available.
- The Raspberry Pi Zero 2 W Arrives Six Years After The First Pi Zero
- Raspberry Pi 4 Has Been Given Vulkan 1.1 Compliance by Khronos
- The Raspberry Pi Build HAT - Complete Guide
- Raspberry Pi Officialy Announced Build HAT For Raspberry Pi
- Installing Android on a Raspberry Pi 4 with Google Play Store
- Pop OS Linux is Coming to Raspberry Pi and Other ARM Devices Soon
- How to Immediately Upgrade to Windows 11
- A Secret Update for the Raspberry Pi 4 8GB
- Raspberry Pi Introduces a New Documentation Hub
- Quick start with ESP8266 based Pico WiFi HAT
- Capture local Real-Time Air Quality Data with Raspberry Pi Pico


.png)


