The Raspberry Pi Pico is a fantastic piece of hardware, but it lacks one crucial feature: Wi-Fi! We came up with the concept of applying Wi-Fi to the Raspberry Pi Pico by chance.
After hearing CircuitPython Lead Developer Scott Shawcroft on The Pi Cast, our weekly Pi-themed broadcast, we discovered that Adafruit had an ESP32-based add-on board that had simple Wi-Fi access, so after a day of tinkering, we built this tutorial that demonstrates how to get your Raspberry Pi Pico online.
To allow Wi-Fi on the Raspberry Pi Pico, you'll need:
The aim of this tutorial is to link our Raspberry Pi Pico to the Internet via Wi-Fi, access the OpenWeather service API, and get the weather for our chosen spot. This raw data is sent to the Python shell, but it could easily be sent to an OLED screen, LCD, or used to initiate a series of events.
Wi-Fi Configuration on the Raspberry Pi Pico
We'll need header pins soldered to the
Raspberry Pi Pico and the Featherwing Airlift for this tutorial. Since we'll be using both boards in a breadboard, the male headers that come with them may suffice. If you choose to use the Featherwing with an Adafruit Feather board, such as the Feather RP2040, female headers must be soldered to the top of the microcontroller. Please keep in mind that the positions of MISO, MOSI, and SCK on the Featherwing are right in the diagram; make sure you recognise these pins and don't focus on counting pins because there is an extra GPIO pin on the Featherwing on the real board.
 |
| Image credit: Tom's Hardware |
Mapping of Pins (Raspberry Pi Pico & Adafruit Airlift WiFi Featherwing Co-Processor) |
| Image credit: Tom's Hardware |
| Raspberry Pi Pico | Adafruit Airlift WiFi Featherwing Co-Processor |
| VSYS | USB |
| GND | Any GND pin |
| GPIO 10 | SCK |
| GPIO 11 | MOSI |
| GPIO 12 | MISO |
| GPIO 13 | ESPCS |
| GPIO 14 | ESPBUSY |
| GPIO 15 | ESPRST |
CircuitPython Installation on a Raspberry Pi Pico
It is easy to instal CircuitPython on the Raspberry Pi Pico.
- Download the most recent CircuitPython for the Pico.
- Insert a USB cable into the Pico and the device by pressing and holding the BOOTSEL button on the Pico.
- Transfer the CircuitPython UF2 file to the RPI-hard RP2's disc. When the code is being flashed, the drive will unmount and vanish. The appearance of a new drive CIRCUITPY confirms that the flash was effective.
- Download the libraries folder for the CircuitPython update you just downloaded. Since we downloaded 6.2.0, we will need to update Bundle Version 6.
- Extract the download's contents to a folder.
- Copy the following files and directories to the CIRCUITPY drive's lib list.
adafruit_bus_device
adafruit_minimqtt
adafruit_io
adafruit_esp32_spi
Adafruit_requests
Making an Account on OpenWeather
For this tutorial, we will use the OpenWeather API to retrieve weather data for any place on the planet. To use the API, we must first create a free account.
- Create an account and log in to the OpenWeather website.
- Go to My APi Keys, which can be found in the dropdown menu for your username.
- Create Key field and press GENERATE.
- Keep this page open in case you need the API key later.
Developing CircuitPython Code
CircuitPython has the same syntax and feel as Python and MicroPython, but unlike MicroPython, we can use any editor we want. We may use Thonny, Mu, or, for professional users, Visual Studio Code with CircuitPython. We used Visual Studio Code for this section of the tutorial, but it really doesn't matter because we're only editing a text file.
1. Open code.py, which can be found in CIRCUITPY, and delete any text in the file.
2. Import the CircuitPython libraries needed for this project to function. The board, busio, and digitalio libraries manage GPIO connectivity, such as the SPI interface. The ESP32's network access is handled by requests, sockets, and esp32spi. Secrets, the last library, does not yet exist. It will be done later.
import board
import busio
from digitalio import DigitalInOut
import adafruit_requests as requests
import adafruit_esp32spi.adafruit_esp32spi_socket as socket
from adafruit_esp32spi import adafruit_esp32spi
from secrets import secrets
3. Have a line that prints a note to the Python Shell, stating what the project can do.
print("Raspberry Pi Pico WiFi Weather Station")
4. Make a new object called JSON URL. This object will contain a URL containing the location we want to search for, as well as an OpenWeather API key that we developed earlier. Replace LOCATION with the name of your town or district, and API KEY with your OpenWeather API key.
JSON_URL = "http://api.openweathermap.org/data/2.5/weather?q=LOCATION&appid=API KEY&units=metric"
5. Create three objects that will be used to bind the ESP32 to the SPI interface. Chip Select (CS), ready, and reset are used to allow and read the ESP32 co-ready processor's state.
esp32_cs = DigitalInOut(board.GP13)
esp32_ready = DigitalInOut(board.GP14)
esp32_reset = DigitalInOut(board.GP15)
6. Create an entity, spi, that tells our code where to find the Pico's SPI interface.
spi = busio.SPI(board.GP10, board.GP11, board.GP12)
7. Create the object, esp, which we will use to inform our code where to locate the ESP32 on the SPI as well as the pins used to monitor the ESP32.
esp = adafruit_esp32spi.ESP_SPIcontrol(spi, esp32_cs, esp32_ready, esp32_reset)
8. Configure the code to use sockets, which are used to link two computers on a network, in this case the Raspberry Pi Pico and the Airlift WiFi Featherwing.
requests.set_socket(socket, esp)
9. Make a loop to bind to Wi-Fi. The next six lines deal with linking to our WiFi access point. The loop operates by looking for a link on the ESP32. While there is no connection, the loop will continue to loop until one is made. Inside this loop is an exception handler that attempts to bind to our WiFi network using the SSID and password from the secrets library, which we will build later. If a link is not established, an error message is shown.
while not esp.is_connected:
    try:
        esp.connect_AP(secrets["ssid"], secrets["password"])
    except RuntimeError as e:
        print("could not connect to AP, retrying: ", e)
        continue
10. Have three lines. The first line prints a message telling us that the code is retrieving weather data, the second line creates an entity, r, that stores the data returned from the OpenWeather API request, and the third line prints the HTTP status code for debugging purposes. A code of 200 indicates that it is running well, while a code in the 400 range indicates that there is an issue with the API.
print("Fetching weather data")
r = requests.get(JSON_URL)
print(r.status_code)
11. Have a line that prints the minus symbol, -, forty times to provide a separator in the Python production.
print("-" * 40)
12. Print the temperature data contained in the returned JSON object using a print feature. Using r.json(), we will search the data for two keywords,'main' and 'temp max,' and directly insert them into the print feature. We add the ‘C' at the end of the line since the temperature data returned is in Celsius.
print("The current temperature is",r.json()['main']['temp_max'],"C")
13. Print another separator line before closing the requests object for these final two lines.
print("-" * 40)
r.close()
14. Save the code as code.py to the CIRCUITPY drive's root directory.
Full Wi-Fi code for the Raspberry Pi Pico
import board
import busio
from digitalio import DigitalInOut
import adafruit_requests as requests
import adafruit_esp32spi.adafruit_esp32spi_socket as socket
from adafruit_esp32spi import adafruit_esp32spi
from secrets import secrets

print("Raspberry Pi Pico WiFi Weather Station")
JSON_URL = "http://api.openweathermap.org/data/2.5/weather?q=LOCATIONl&appid=APIKEY&units=metric"

esp32_cs = DigitalInOut(board.GP13)
esp32_ready = DigitalInOut(board.GP14)
esp32_reset = DigitalInOut(board.GP15)

spi = busio.SPI(board.GP10, board.GP11, board.GP12)
esp = adafruit_esp32spi.ESP_SPIcontrol(spi, esp32_cs, esp32_ready, esp32_reset)

requests.set_socket(socket, esp)

while not esp.is_connected:
    try:
        esp.connect_AP(secrets["ssid"], secrets["password"])
    except RuntimeError as e:
        print("could not connect to AP, retrying: ", e)
        continue
print("Fetching weather data")
r = requests.get(JSON_URL)
print(r.status_code)
print("-" * 40)
print("The current temperature is",r.json()['main']['temp_max'],"C")
print("-" * 40)
r.close()
Creating a Wi-Fi Login Secrets File
We will save our Wi-Fi SSID, username, and password in the secrets.py format. Since we import the library and then call the dictionary containing the SSID and password, it behaves similarly to a Python library in our main code. Before we can do something else, we must first build the secrets.py file.
1. Open your text editor and create a new file.
2. Make a dictionary called secrets that includes the router's SSID and password. Set the timezone to the timezone of your place.
secrets = {
   'ssid' : 'YOUR WIFI AP',
   'password' : 'YOUR PASSWORD',
   'timezone' : 'Europe/London', # http://worldtimeapi.org/timezones
   }
3. Save the file as secrets.py in the same directory where you saved code.py.
Running the Wi-Fi code on a Raspberry Pi Pico
The code will run automatically, but we will only see the results if we are linked to the Python Shell.
The only way to do this is to use a terminal emulator such as PuTTY.
1. Download and mount PuTTY.
2. If it isn't already attached, add your Pico to the device.
3. Determine the Pico's COM port number. In Windows, open the Device Manager, search for Ports, press the drop down menu, and locate the entry for your Pico (it's not explicitly labelled, so you will need to plug and unplug to see which disappears). COM4 was the channel we were on.
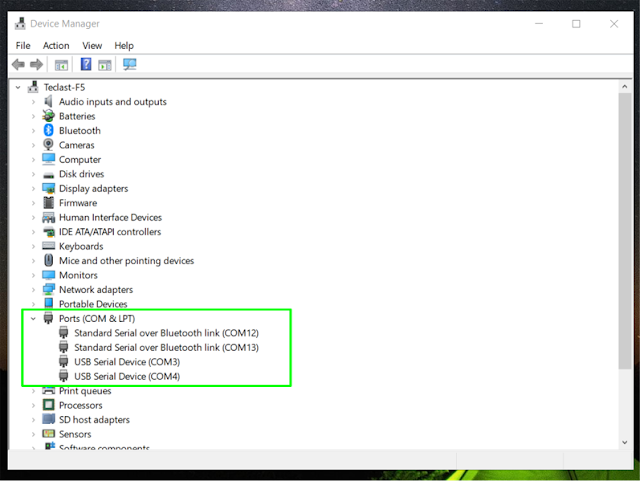 |
| Image credit: Tom's Hardware |
4.
Launch PuTTY, choose Serial, and then configure the serial line to fit the COM port mentioned in Device Manager. Set the Speed to 115200 and then press the Open button.
 |
| Image credit: Tom's Hardware |
PuTTY will establish a connection and display the Python Shell.
5. Restart the shell and execute the code by pressing CTRL+D. The most recent weather for your place will be shown after a few seconds.
 |
| Image credit: Tom's Hardware |
The lifeblood of the
Raspberry Pi and maker communities is the first and third component accessories. They provide new features and make it easier to complete projects.
SB Components, a UK-based official Raspberry Pi Reseller, was the first to market. They have launched 17 new Pico accessories, ranging from basic breakout boards that allow several addons to be utilised for DIY projects to exploring the potential of the Raspberry Pi Pico, and a Pico LoRa™ Expansion board, which comes with an onboard CH340 USB TO UART converter, Voltage Level Translator(74HC125V), E22-900T22S SMA antenna connector that covers 868MHz & 433MHz frequency band. We have shared the products below:
Pico LoRa Expansion 868MHz :
Pico LoRa™ Expansion is a low-power consumption data transmission board that includes an onboard CH340 USB TO UART converter, a Voltage Level Translator (74HC125V), an E22-900T22S SMA antenna connector that covers the 868MHz frequency band, an onboard
1.14" LCD, an IPEX antenna connector, and LoRa™ Spread Spectrum Modulation technology with auto multi-level repeating. Pico LoRa™ Expansion is developed to enable data transmission up to 5 KM through serial port. Pico LoRa™ Expansion was created to allow data transfer up to 5 kilometres through serial interface.
433MHz LoRa Expansion for Pico also Available.
1.28” Round LCD HAT for Pico :
1.28-inch display HAT with 240 x 240 resolution, 65K RGB colours, crisp and colourful display effect, and joystick, developed for the
Raspberry Pi Pico to broaden its engagement through SPI connection by offering a standard 40 pin
Pico GPIO interface.
1.14” LCD HAT For Pico : 1.14-inch display expansion board module with a
joystick and a resolution of 240135, 65K RGB colours, clean and colourful presenting effect, created specifically for
Raspberry Pi Pico to increase its involvement through SPI connection by offering a standard 40 pin GPIO interface.
Pico Motor Driver HAT :
DC motor control module supplied by one H-bridge IC L293D with a motor input supply voltage range of 6 V to 12 V. It is intended to link two
DC motors at the same time or one stepper motor, allowing the user to create projects with a small footprint and great efficiency.
Pico RFID Expansion : RFID Reader with a 125KHz frequency and a small design that includes a programmable 0.91” Oled screen and an improved UART/I2C interface that is compatible with the
Raspberry Pi Pico Board.
Pico Dual Channel Relay HAT : Relay HAT is a two-channel high-quality relay with loads up to 250V AC/ 7 A, 30V DC/ 10A to control high voltage/current devices.
Pico Single Channel Relay HAT : It can handle loads of up to 250V AC/ 7A and 30V DC/ 10A, allowing you to manage high voltage/current devices. It has a Female Pin Header for easy connection to the Raspberry Pi Pico through stacking.
Pico 3V Relay HAT : High-quality two-channel relay with a switching voltage (VAC) of up to 2A/120V (Max), a switching voltage (VDC) of up to 2A/24V (Max), and an operating voltage of 3.3V.
Pico 2 Channel Expander : Pico 2 CH Expander is intended specifically for use as a GPIO extender, having
2 sets of 2 x 20 pin headers for
connecting to HATs or Breadboards.
Pico 4 Channel Expander : Pico 4 Channel Expander is intended to function as a GPIO extender by offering 4 sets of two 20-pin headers for use with HATs or breadboards.
Pico HAT Expansion : HAT Expansion is a Raspberry Pi Pico input/output expansion board that includes one set of 2x20 pin headers in the form of a Raspberry Pi Header and one set of 2 x 20 pin. This implies that any HAT developed for the
Raspberry Pi Board can be plugged in.
Pico GPIO Expansion Board : Pico GPIO Expansion Board with 3.3 V output voltage. Pico GPIO Expansion Board is designed to split off all of the Raspberry Pi Pico development board's pins and power in two ways (male or female header). It enables the user to connect it to other components via a jumper wire.
Pico Breadboard Kit : A multi-purpose Kit with a "400 points half-size breadboard" on top, a Programmable Buzzer, 4 Programmable LEDs, 4 Push buttons, and dedicated 5V, 3v3, and GND pins all in one spot. It contains sophisticated features like as individually controlled LEDs, switches, and a 400-point half-size breadboard that allows users to efficiently prototype their ideas using the Raspberry Pi Pico.
Pico Relay Board : Up to four appliances and loads of up to 250V AC at 7A and 30V DC at 10A can be controlled. It allows users to control high-voltage/high-current devices. It has a “Optocoupler,” which enables the circuit to convey an electrical signal between two separated circuits using light energy.
Pico Zero Board : Pico Zero Board is a useful and well-labelled board with a 6x20 grid of 2.54mm spacing mounting holes that allows users to quickly solder the Pico pins. With properly connecting bespoke circuits, the
Pico Zero Board provides a secure, compact, and long-term safe housing for your breadboard project!
Pico Zero Expansion : cleanly labelled expansion, with a 6x20 grid in the centre for the Raspberry Pi Pico and an 8x20 grid on both sides to connect peripherals, 2.54mm spacing mounting holes suited for users to simply solder the Pico pins
Posts You May like:


.png)


