

This project does not cover home network security; nonetheless, you should use passwords and ensure that your network is adequately protected from outside access.

Without any formal IT experience, I was able to accomplish this in a short amount of time because to all of the amazing open source contributions that I have linked throughout the project.
If you have any new light modes, please share them in the comments; I'll be working on a twinkle function next.
Parts Needed for the Project:
- Raspberry Pi is a small computer that runs on the (I am using a Zero V2 however any Pi with WiFi will work)
- String of NeoPixels (I am using 5x50 strings joined together)
- 5 volt power supply (make sure it has a high enough power output for the number of LEDs you have, I am using multiple USB chargers I had around the house)
- Green electrical tape (quantity) (used to hide the red, green and white wires on the lights)
- To put it all together, you'll need a case.
Step 1: Set up the Raspberry Pi
- To set up your Pi and install Node-RED and the essential packages, do the following.
- Set up your Pi; if you're doing a headless setup, ensure sure SSH and/or VNC are enabled.
- You can use whichever method you choose to get at your pi (SSH is the easiest at this point on a headless set up)
- Your Raspberry Pi should be updated.
- Use the following command to install Node-RED:
Set Node-RED to start automatically when the computer boots up:
If you want to use LED HAT for the lights
Install PiCube 4x4x4 LED cube HAT for Raspberry Pi a 64 monochromatic (Red, Blue, Green) LED device
Python
- Stack PiCube on Raspberry Pi 40 Pin GPIO header.
- Open Git Bash Terminal and clone/download the repository by typing the below command in the terminal:
git clone https://github.com/sbcshop/PiCube.git
Your code will be downloaded to the '/home/pi' directory. Use the 'ls' command to check the list of directories and the 'cd' command to enter the directory.
cd PiCube
- 'demo.py' is an example code for PiCube. Run test file and play with PiCube by running below python command.
python3 demo.py
It will run a different LED pattern on PiCube. You can also modify this code to put your own creativity.
Step 2: Set Up Node-RED
We may access our server through the Pi it is installed on (http://localhost:1880) or any computer on your local network now that your Pi is set up and we should have a functional Node-RED Server. When surfing from a different computer, use the Pi's hostname or IP address: http://hostname>:1880. Running hostname -I on the Pi will provide the IP address.
We'll need to add additional modules now so that we can build our flow, interact with it, and communicate with our LEDs. We're going to add two more:
- node-red-dashboard
- node-red-node-pi-neopixel
If you want to use the command line to add them, simply follow the links to locate the command; just make sure you're in the right directory so Node-RED can discover them. Alternatively, you can just add them using the UI on the page you just visited:
- In the upper right corner, click the "Menu" button (three horizontal bars).
- choose "Manage palette" from the drop-down menu.
- pick the "Install" tab from the drop-down menu.
- in the search field, type "node-red-dashboard"
- Choose "install" from the top-level option.
- Enter "node-red-node-pi-neopixel" once it's finished.
- Choose "install" from what should be the sole choice available.
- "Close" is the option to choose.
Node-RED should now have all of the necessary modules to power our LEDs and UI. The flow that describes the inputs and outputs between the use, the Pi, and the LEDs may now be added.
- In the upper right corner, click the "Menu" button (three horizontal bars).
- pick "Import" from the drop-down menu.
- Fill in the blanks in the box that should now be open:
- pick "Import"
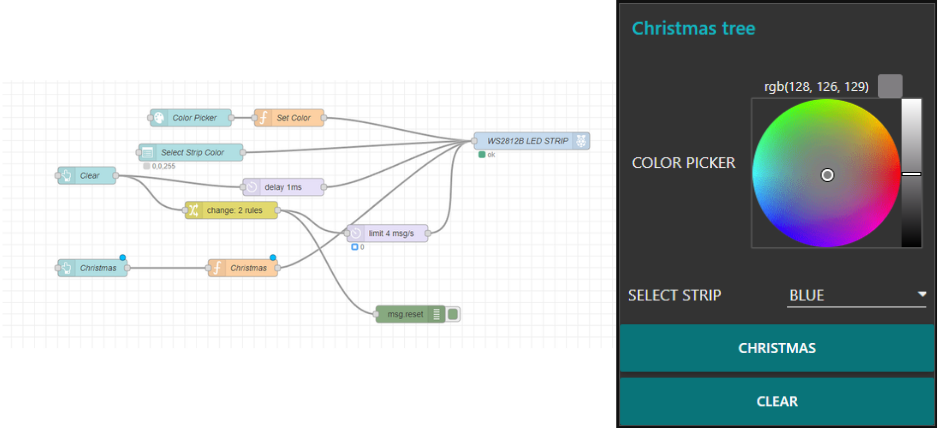
- You should now be able to observe the flow depicted in the diagram.
- In the upper right corner, click "Deploy."
- Open a new browser and go to "http://hostname>:1880/ui" (change "hostname>" with the IP address of your Pi). You should now be able to see and interact with the picture of the user interface.
Note: The light intensity in this code is set to 40%, which limits power consumption for the PSU I'm using and is a good level for the LEDs I'm using. If you wish to change this, double-click the rpi-neopixels node at the end of the flow, and you'll get a box where you may do so.
Step 3: Connection
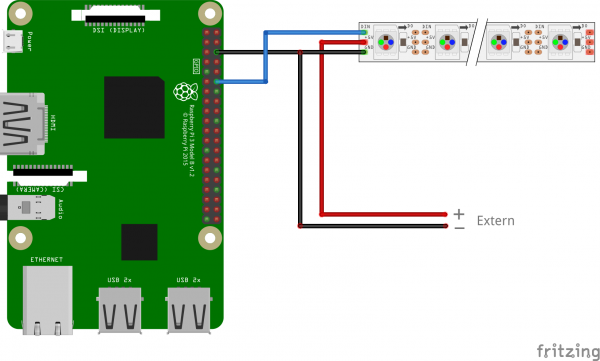
Before connecting any cables, make sure your Pi is turned off! Wiring the LEDs to the Pi is simple; all you have to do is connect the ground and signal cables from the LEDs. However, make sure you connect the right connections; mine were coloured:
- Vinegar - Red
- Pin 6 on the Raspberry Pi - Ground - White
- Pin 12 (GPIO 18) on the Pi - Signal - Green (this is why your audio needs to be HDMI only on the Pi as audio via GPIO uses the same pin)
You may now connect your PSU to the LED strip once you've linked the Pi. Depending on the length of your LED strip, you may wish to connect the power supply at several points along the strip (hide it at the back of the tree).
Launching Soon On @Kickstarter
— SB Components Ltd (@sb_ltd) December 17, 2021
𝐔𝐏𝐒 𝐇𝐀𝐓 𝐅𝐨𝐫 𝐑𝐚𝐬𝐩𝐛𝐞𝐫𝐫𝐲 𝐏𝐢
Efficient and Smart way to use your Raspberry Pi · Stable 5V Power Output · Standard Raspberry Pi 40PIN GPIO extension header, supports @Raspberry_Pi Serieshttps://t.co/kw87Ux7vMQ pic.twitter.com/3LJnw5pvxE
Please ensure that any exposed wires are insulated with electrical tape and that everything is contained to prevent children from getting into it.
After you've finished wiring everything up, you can power up the Pi and the lights. Navigate to "http://hostname>:1880/ui" (change hostname> with your Pi's IP address) from your device of choice once the Pi has booted up. Simply press anywhere on the colour wheel or the Christmas button once you've arrived, and your lights should spring to life!
Credit: Ekul92
Posts You May like:
- RP2040 Board Supports Raspberry Pi HATs - StackyPi
- The RP2040 StackyPi is a Pi Zero-sized Raspberry Pi that supports HATs.
- How to Block Ads with Pi-hole on a Raspberry Pi Zero 2 W
- Uninterruptible Power Supply UPS HAT For Raspberry Pi
- A hidden speed boost and a 64-bit option are included in the new #RaspberryPi #OS
- Using the On-Board Bluetooth on the Raspberry Pi 4 for Communication
- #ArduinoIDE 2.0 Release Candidate (RC)
- Armbian Linux on the Raspberry Pi 4: A First Look
- NeoPixel Christmas Tree Lights Controlled by a Raspberry Pi
- What Type of LoRa Modules are Available?
- Introducing The VisionFive V1 is a RISC-V Based Raspberry Pi Replacement - Available Soon
- Raspberry Pi Zero 2 W Overclocking - Boost Up To 1.2GHz, or even 1.4GHz
- The Arduino UNO Mini Limited Edition is Now Available
- Scan QR Codes with Raspberry Pi Pico
- Create Barcodes with Pure Python
- The New Version of Raspberry Pi OS, Debian "Bullseye" is Now Available.
- The Raspberry Pi Zero 2 W Arrives Six Years After The First Pi Zero
- Raspberry Pi 4 Has Been Given Vulkan 1.1 Compliance by Khronos
- The Raspberry Pi Build HAT - Complete Guide
- Raspberry Pi Officialy Announced Build HAT For Raspberry Pi
- Installing Android on a Raspberry Pi 4 with Google Play Store
- Pop OS Linux is Coming to Raspberry Pi and Other ARM Devices Soon
- How to Immediately Upgrade to Windows 11
- A Secret Update for the Raspberry Pi 4 8GB
- Rasspberry Pi Introduces a New Documentation Hub
- Quick start with ESP8266 based Pico WiFi HAT
- Capture local Real-Time Air Quality Data with Raspberry Pi Pico
- Debian 10 Buster to Debian 11 Bullseye Upgrade
- How to Use CIFS to Mount a Windows Share on Linux
- Both 1.54 and 2.7 inch Raspberry Pi E Paper HATs are available.
- How do I enable Desktop to Raspberry Pi 4 2GB
- Ubuntu 22.04 to Bring the Desktop to Raspberry Pi 4 2GB Users
- How to Use BerryBoot to Dual-Boot a Raspberry Pi
- StackyPi - Based on Raspberry Pi RP2040 Microcontroller
- Enhance your Raspberry Pi with Audio - Audio Codec HAT
- Ubuntu 22.04 to Bring the Desktop to Raspberry Pi 4 2GB Users
- Audio Codec HAT adds sound to your Raspberry Pi
- The KiCad Project Announced Version 6.0.0. #KiCad @kicad_pcb
- LoRa HAT is Finally Out! Supports 915MHz | 868MHz | 433MHz
- How to Block Ads with Pi-hole on a Raspberry Pi Zero 2 W
- Uninterruptible Power Supply UPS HAT For Raspberry Pi
- A hidden speed boost and a 64-bit option are included in the new #RaspberryPi #OS
- Using the On-Board Bluetooth on the Raspberry Pi 4 for Communication
- #ArduinoIDE 2.0 Release Candidate (RC)
- Armbian Linux on the Raspberry Pi 4: A First Look
- NeoPixel Christmas Tree Lights Controlled by a Raspberry Pi


.png)


