You may download the final version of Windows 11 whenever you like.
Anyone with Windows 10 and a PC that satisfies Microsoft's minimal hardware requirements may now get the official release version of Windows 11 for free. On or around the official launch date of October 5th, some users may be given the opportunity to update in their Settings menu, while others may have to wait until 2022.
Thankfully, you won't have to wait for the Windows Update gods to grant you permission. You may force a Windows 11 update right now if you want to take matters into your own hands. We'll teach you how to upgrade from Windows 10 to Windows 11 in the sections below. You should download a Windows 11 ISO and do a clean install if you wish to start from scratch on a new PC. And, if you don't like the new operating system, you may easily remove it.
𝐋𝐚𝐮𝐧𝐜𝐡𝐢𝐧𝐠 𝐎𝐧 𝟖𝐭𝐡 𝐎𝐜𝐭𝐨𝐛𝐞𝐫, 𝟐𝟎𝟐𝟏
— SB Components Ltd (@sb_ltd) October 4, 2021
𝟒 𝐱 𝟒 𝐱 𝟒 𝐏𝐢𝐜𝐨 𝐋𝐄𝐃 𝐂𝐮𝐛𝐞 𝐅𝐨𝐫 𝐑𝐚𝐬𝐩𝐛𝐞𝐫𝐫𝐲 𝐏𝐢 𝐏𝐢𝐜𝐨
64 Mono-Chromatic LED | Red, Green and Blue Variants | 40 Pins GPIO | Individual LED Access
Visit: https://t.co/T38sEvlgRz@Raspberry_Pi pic.twitter.com/HECSqxwFZL
But first, let's go through the system requirements.
Does Your PC Meet the Windows 11 System Requirements?
When it comes to upgrading to Windows 11, Microsoft has some very rigorous hardware requirements. The most important of them is that your computer must have TPM 2.0, at least 4GB of RAM, a 720p monitor, a minimum of 64GB of storage, a graphics card capable of DX12, and one of the Intel or AMD CPUs that are expressly supported. Most 7th generation or earlier Intel CPUs, as well as first-generation AMD Ryzens, are not included in Microsoft's processor listings. The official Windows 11 system requirements website has further information.
If your PC doesn't satisfy these requirements, Microsoft will not ask you to update; but, as we'll show you below, you may be able to force an upgrade by utilising installation media. The installation will notify you that your machine isn't compatible, but it will still allow you proceed.
If you don't have TPM, though, you'll have to use a specific script to get around Windows 11's TPM requirement. However, Microsoft may refuse to push you any upgrades, including security patches, so updating an unsupported machine is dangerous, especially since Windows 11 isn't a mandatory upgrade.
Windows Update may be used to upgrade to Windows 11 if you haven't already.
The most straightforward approach to update to Windows 11 is to just wait for Microsoft to make it accessible under the Windows Update section of Settings. However, because this is a slow rollout, that may not happen for weeks or months. As a result, the first thing you should do is check to see if the upgrade is accessible to you through this channel.
 |
| Window 11 Upgrade |
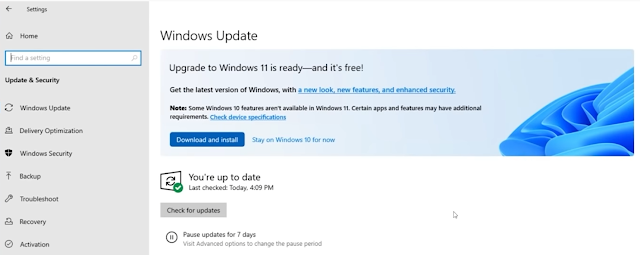
1. Go to the Windows Update submenu in the settings menu. The quickest method to get there is to use Windows search and select the first result for "Windows Update." You may also go to Settings->Update & Security to see what's new.
If you get a notice like the one below, which says "Specific timing for when it will be given can vary," that implies you'll have to force an update if you want it immediately.
2. Select Download and Install from the drop-down menu.
3. Agree to the terms of the licencing agreement.
The download and installation of Windows Update will now take several minutes.
4. When requested, restart your computer. You'll be on Windows 11 when it restarts.
How to Use Upgrade Assistant to Upgrade to Windows 11
If your PC satisfies the Windows 11 hardware requirements but Microsoft hasn't yet pushed the upgrade to you, utilising Microsoft's Windows 11 Installation Assistant is the simplest method to acquire it.
1. Go to the download page for Windows 11.
2. In the Windows Installation Assistant, select Download Now. The setup assistance will begin to download.
3. Use the Windows 11 Installation Assistant to get Windows 11 up and running.
4. Select Accept and Install from the drop-down menu.
Accept and Install is selected.
It will take several minutes for the Installation Assistant to download and install Windows 11.
5. When requested, restart your computer. During the installation, your computer will take several minutes and restart itself a few times.
How to Force an Upgrade Using Installation Media
Even if your machine doesn't fulfil all of the requirements, you may force an update by creating your own Windows 11 installation media — a bootable USB flash drive. Note that you'll need a disc with at least 8GB of space and that it will be erased, so make sure you don't have any important data on it.
1. Go to the Microsoft Windows 11 Download page.
2. Select Download Now from the Windows 11 Installation Media drop-down menu. The Media Creation Tool is about to start downloading.
3. Go to the Media Creation Tool and start it up.
4. Accept the offer.
5. When prompted to select a language and edition, select Next.
6. If your USB Flash drive isn't already plugged, do it now.
7. Click Next after selecting USB Flash Drive.
8. If there are many drives attached, select the one you want to use and click Next.
The software will now download Windows 11 to your USB flash drive and install it.
9. Click the Finish button. The volume name on the Flash drive may have changed to ESD-USB.
10. From the USB Flash drive, run the setup.exe programme. You'll be guided through the upgrading procedure now. If asked by user account control, choose Yes.
11. Press the Next button. Your system will be examined by the installer. If it discovers that your system does not match the minimal criteria but does have TPM, it may display a warning message advising you not to upgrade but allowing you to proceed.
12. If you get the notification and wish to proceed, click Accept on the "What requires your attention" page. This warning will not appear if your machine satisfies the criteria.
13. To accept the licencing conditions, click Accept.
It will take a minute or two for the system to download certain updates.
14. Press the Install button.
The installation procedure will take many minutes and will most likely require multiple reboots. After that, you'll have Windows 11.
Source: Tom's Hardware
Posts You May like:
- Create Barcodes with Pure Python
- A Secret Update for the Raspberry Pi 4 8GB
- Pico Sense HAT - Raspberry Pi Environment Monitoring Add-on Pico
- Raspberry Pi Introduces a New Documentation Hub
- Quick start with ESP8266 based Pico WiFi HAT
- Capture local Real-Time Air Quality Data with Raspberry Pi Pico
- GitHub CLI 2.0 Is Now Available, With Extension Support
- Connecting Wi-Fi on Raspberry Pi Pico Become Easy
- How To Track All Devices with Raspberry Pi
- Make your own Raspberry Pi Image from scratch
- How to Send phone notifications Using Raspberry Pi Pico?
- Raspberry Pi Pico 4G/2G Expansion : Expectations vs. Reality
- Quick Example to Drive Servo Using Programmable I/O
- How to Use a USB SSD or Flash Drive to Boot a Raspberry Pi 4 / Pi 400
- Filter Ads by your Raspberry Pi Before they Reach your Devices
- A Raspberry Pi 4 Model A Launch 2022 - Eben Upton
- First-Ever 2G Expansion Board for Raspberry Pi Pico has Launched on Kickstarter
- Learn IoT "Internet of Things" with 24 lessons for Teachers and Students
- Quick Guide for Raspberry Pi Users: Raspberry Pi Terminal Commands
- Windows 11 on Raspberry Pi Devices in Easy Installation Guide
- Get Your Project Done by Raspberry Pi Approved Design Partners
- PiRelay 8 Smart Relay Board for Raspberry Pi - Kickstarter
- Tiny Round/Circular LCD Display Launched!
- Issue Fixed! USB Boot Ubuntu Server 20.04 on Raspberry Pi 4
- HC-SR04 Sensor with micro-ROS on the Raspberry Pi Pico
- Raspberry Pi Pico: ADC Sampling and FFT
- Using CircuitPython for RP2040
- How to Setup Pico RP2040 on Windows
- Using micro-ROS on the Raspberry Pi Pico
- LED Tricks Using The Raspberry Pi Pico
- The RP2040 Raspberry Pi Pico Meets LoRa
- Pico supports SD cards and FatFS
- How to connect a Raspberry Pi Pico to LoRaWAN
- 50 Raspberry Pi Hacks & Tips You Should Know
- How to Install Wi-Fi and Internet on a Raspberry Pi Pico


.png)


