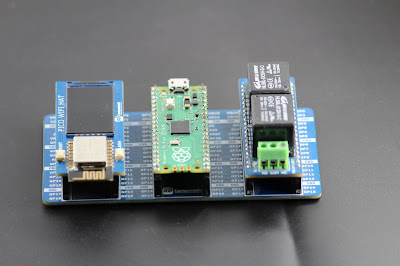
While adding wireless connectivity to your Raspberry Pi Pico is a good concept, Pico WiFi HAT connects to the back of your Pi and utilises an ESP8266 high integration wireless SoC to connect to 2.4GHz wireless networks and transmit data. Pico WiFi HAT also includes a 1.14-inch display with a resolution of 240 x 135 pixels, 65K RGB colours, and a sharp and vivid exhibiting effect, designed primarily for user engagement via SPI connection by incorporating a GPIO header.
The ST7789 Driver and SPI Interface are included in the 1.14-inch LCD, reducing the number of IO pins required. It also has two reset buttons and a flash button that may be used to upgrade the firmware on the ESP8266 WiFi Chip.
 |
| Pico WiFi HAT |
Pico WiFi HAT is ideal for easily adding wireless capabilities to an existing Pico project, such as transmitting sensor data into home automation systems or dashboards, hosting a web page from a matchbox, or allowing your Pico to communicate with internet APIs.
It comes with female headers that allow it to be plugged directly into the Raspberry Pi Pico's rear, as seen above, or into a "Pico 2 Channel expander & 4 Channel expander" board, as shown below.
 |
| Pico 2 Channel Expander |
Why should you use the Pico WiFi HAT?
Because WiFi is controlled by a different chip, your code is easier to write because you don't have to cache socket data or develop and debug an SSL library. Pico Wifi allows you to transmit basic yet strong socket-based commands for high-speed data transmission via 2.4GHz SPI. The ESP8266 can handle all of the hard lifting of connecting to a WiFi network and transmitting data from a site, utilising the most up-to-date WEP64 / WEP128 / TKIP / AES encryption with IPv4, TCP / UDP / FTP / HTTP Network Protocol.
All Pico Wi-Fi HATs come with AT firmware preloaded, allowing you to build and design your projects without having to update the AT firmware for the ESp8266.
Complete installation process visit: https://learn.sb-components.co.uk/Pico-wifi-HAT
Posts You May like:
- Capture local Real-Time Air Quality Data with Raspberry Pi Pico
- GitHub CLI 2.0 Is Now Available, With Extension Support
- Connecting Wi-Fi on Raspberry Pi Pico Become Easy
- How To Track All Devices with Raspberry Pi
- Make your own Raspberry Pi Image from scratch
- How to Send phone notifications Using Raspberry Pi Pico?
- Raspberry Pi Pico 4G/2G Expansion : Expectations vs. Reality
- Quick Example to Drive Servo Using Programmable I/O
- How to Use a USB SSD or Flash Drive to Boot a Raspberry Pi 4 / Pi 400
- Filter Ads by your Raspberry Pi Before they Reach your Devices
- A Raspberry Pi 4 Model A Launch 2022 - Eben Upton
- First-Ever 2G Expansion Board for Raspberry Pi Pico has Launched on Kickstarter
- Learn IoT "Internet of Things" with 24 lessons for Teachers and Students
- Quick Guide for Raspberry Pi Users: Raspberry Pi Terminal Commands
- Windows 11 on Raspberry Pi Devices in Easy Installation Guide
- Get Your Project Done by Raspberry Pi Approved Design Partners
- PiRelay 8 Smart Relay Board for Raspberry Pi - Kickstarter
- Tiny Round/Circular LCD Display Launched!
- Issue Fixed! USB Boot Ubuntu Server 20.04 on Raspberry Pi 4
- HC-SR04 Sensor with micro-ROS on the Raspberry Pi Pico
- Raspberry Pi Pico: ADC Sampling and FFT
- Using CircuitPython for RP2040
- How to Setup Pico RP2040 on Windows
- Using micro-ROS on the Raspberry Pi Pico
- LED Tricks Using The Raspberry Pi Pico
- The RP2040 Raspberry Pi Pico Meets LoRa
- Pico supports SD cards and FatFS
- How to connect a Raspberry Pi Pico to LoRaWAN
- 50 Raspberry Pi Hacks & Tips You Should Know
- How to Install Wi-Fi and Internet on a Raspberry Pi Pico


.png)


