Run Arduino Code On Your Raspberry Pi Pico
With your Pico, you can use Arduino's common language and development environment.
There are two types of wiring coding for your Raspberry Pi Pico. For novice users, the simplest option is to use a Python version such as MicroPython or CircuitPython. For more experienced users, a more technical method is to write code in C/C++.
There is now a third way to write code for our Raspberry Pi Pico: the Arduino IDE, which uses “Arduino Language,” a C++ derivative. Since Arduino has been around for so long, there are a plethora of pre-existing “sketches” (the Arduino word for programmes) and tutorials available for it. If you've previously dealt with Arduino boards, you're probably very familiar with this versatile IDE and vocabulary.
We went through a number of different configuration procedures and discovered two community-created projects that reduce the installation process to only a few steps. The first is pico-setup-windows, a Windows port of Pico's official setup document. The second is Arduino-Pico, which adds Raspberry Pi Pico support to the Arduino IDE. This guide will teach you how to configure your Windows or Ubuntu system to run Arduino code on your Raspberry Pi Pico.
How to Use the Arduino IDE for Windows to Program a Raspberry Pi Pico
1. Download and update the pico-setup-windows installer. This is a big file to copy.
2. Start the installer.
3. Ensure that all of the elements have been chosen. This will download and upload approximately 360MB of files and software on your computer. Contains the files used to create C/C++ files, as well as Visual Studio Code and Git version control.
4. To instal all of the software, click Install. This can take some time, and it can appear lost at times, so be careful.
5. Download and update the Arduino IDE on your computer. We used version 1.8.13, but the beta of version 2.0 still fits.
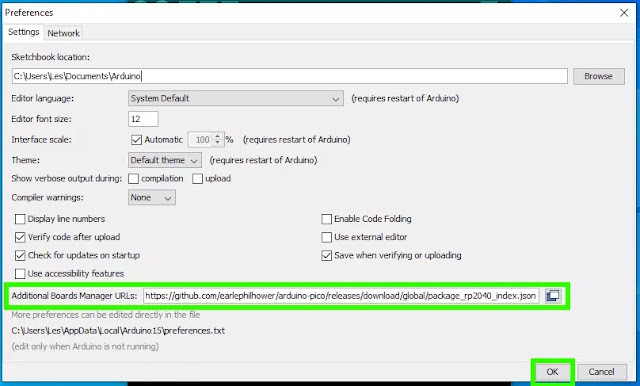
6. Launch the Arduino software and go to File >> Preferences.
 |
| Image credit: Tom's Hardware |
7. Add this line to the additional boards manager and press OK.
https://github.com/earlephilhower/arduino-pico/releases/download/global/package_rp2040_index.json
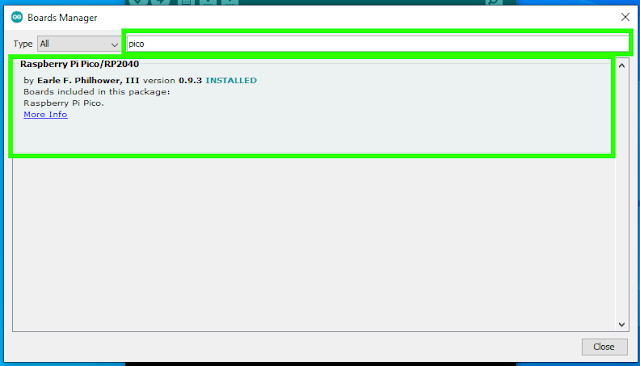
8. Navigate to Tools >> Boards Manager.
 |
| Image credit: Tom's Hardware |
9. In the search window, type "pico," and then instal the Raspberry Pi Pico / RP2040 board. This will initiate another massive update, this time about 300MB in size.
 |
| Image credit: Tom's Hardware |
10. Pick Raspberry Pi Pico from the Tools >> Board >> Raspberry Pi RP2040 Boards menu.
11. Plug in your Raspberry Pi Pico and use Device Manager to find the COM port to which it is attached.
12. Set the COM port for the Raspberry Pi Pico under Tools >> Port.
 |
| Image credit: Tom's Hardware |
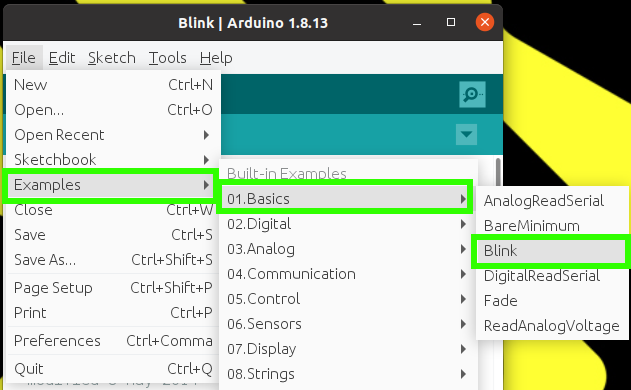
13. Navigate to Files >> Examples >> Basics >> Blink to see how we can programme the Arduino.
 |
| Image credit: Tom's Hardware |
14. Press the Upload button to upload the code to the Raspberry Pi Pico. The default Blink sketch on the Raspberry Pi Pico will light the green LED next to the micro USB connector.
 |
| Image credit: Tom's Hardware |
When the upload is over, the output window will notify us. When you look at your Raspberry Pi Pico, you will see the green LED blinking once every second.
How to Use the Arduino IDE for Linux to Program a Raspberry Pi Pico
For this guide, we used Ubuntu, but the same instructions should function for other Debian-based distributions like Raspberry Pi OS.
1. Launch a terminal and use wget to import the Pico setup script.
$ wget https://raw.githubusercontent.com/raspberrypi/pico-setup/master/pico_setup.sh
$ chmod +x pico_setup.sh
$ ./pico_setup.sh
4. Download and update the Arduino IDE on your computer. We used version 1.8.13, but the beta of version 2.0 still fits.
5. Launch a terminal and connect the user to the "dialout" party. This party has the ability to interact with devices such as the Arduino. Using “$USER” can use the username by default.
$ sudo usermod -a -G dialout “$USER”
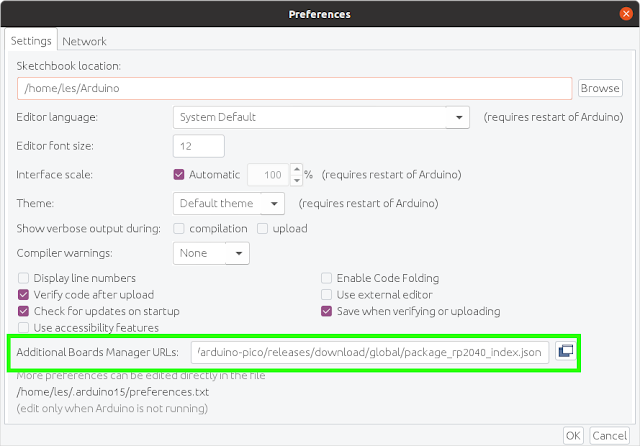
7. Launch the Arduino software and navigate to File >> Preferences.
8. Connect this line to the additional boards manager and press OK.
 |
| Image credit: Tom's Hardware |
https://github.com/earlephilhower/arduino-pico/releases/download/global/package_rp2040_index.json
9. Navigate to Tools >> Boards Manager.
10. In the search window, type "pico," and then instal the Raspberry Pi Pico / RP2040 board. This will initiate another massive update, this time about 300MB in size.
11. Pick Raspberry Pi Pico from the Tools >> Board >> Raspberry Pi RP2040 Boards menu.
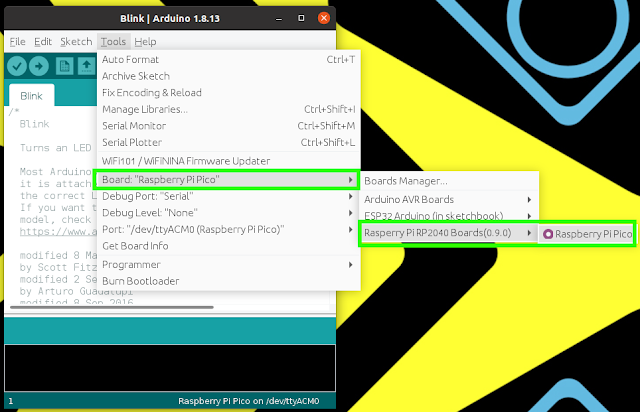 |
| Image credit: Tom's Hardware |
12. Plug in your Raspberry Pi Pico
13. Execute a command to find the USB device that describes itself as a Raspberry Pi Pico. It was ttyACM0 in our case.
$ dmesg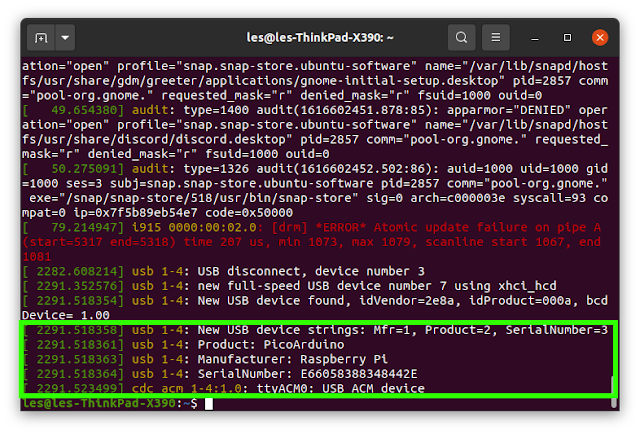 |
| Image credit: Tom's Hardware |
14. Navigate to Files >> Examples >> Basics >> Blink to see how we can programme the Arduino.
 |
| Image credit: Tom's Hardware |
15. Press the Upload button to send the code to the Raspberry Pi Pico. The default Blink sketch on the Raspberry Pi Pico will light the green LED next to the micro USB connector.
 |
| Image credit: Tom's Hardware |
When the upload is over, the output window will notify us. When you look at your Raspberry Pi Pico, you will see the green LED blinking once every second.
Credit To Author: LES POUNDER
Related Articles:
- The Raspberry Pi RP2040 is now supported by the Arduino Core mbed 2.0!
- Comparison Between BBC micro:bit & Raspberry Pi Pico
- Best Raspberry Pi Pico Breakout And Pico HAT
- Pico Projects For Beginners - Raspberry Pi
- Raspberry Pi Pico RP2040 | Most Affordable Super Tiny Computer
- Raspberry Pi Pico Launched Globally With Pico Add-On & Pico Expansions
- Drag-and-Drop Programming For The Raspberry Pi Pico
- Easiest Way to to Run DC Motor with Raspberry Pi Pico
- How to Install Wi-Fi and Internet on a Raspberry Pi Pico
- How to connect a Raspberry Pi Pico to LoRaWAN
- 50 Raspberry Pi Hacks & Tips You Should Know


.png)


