

A service called Changedetction.io can tell whether a given website has undergone changes. Similar to our Python website monitor project, but more sophisticated.
This service operates by regularly capturing a page's output. The service may then notify you whenever a change is made, giving you a simple method to know what precisely changed since the last update.

For Changedetection.io, the Raspberry Pi is a great option since it is a reasonably low-powered gadget that can be left running continuously for a reasonable price.
Below is a list of the equipment we used to set up Changedetection.io on the Raspberry Pi Board.
- Raspberry Pi
- Micro SD Card
- Power Supply
- Ethernet Cable or Wi-Fi
Optional
Changedetection.io Setting on a Raspberry Pi
A service called Changedetction.io can tell whether a given website has undergone changes. Similar to our Python website monitor project, but more sophisticated.
This service operates by regularly capturing a page's output. The service may then notify you whenever a change is made, giving you a simple method to know what precisely changed since the last update.
1. For Changedetection.io, the Raspberry Pi is a great option since it is a reasonably low-powered gadget that can be left running continuously for a reasonable price.
To carry out both of these tasks, you can issue the two instructions shown below.
2. After updating your package list, execute the command below to install docker-compose on the Raspberry Pi.

The Changedetection.io docker container may be downloaded to our Raspberry Pi using this package, which includes all the necessary software. Additionally, it will enable us to install a further package in a single call.
Installing Changedetection.io on the Raspberry Pi
We can now install Changedetection.io on your Raspberry Pi once Docker has been set up.
The only thing left to do is create a fast Docker configuration file and then "start" it since this website change monitor is already accessible as a Docker image.
1. Let's start by making a directory to house the "docker-compose.yml" file we'll be writing shortly.
Using the mkdir command, we can create a directory called "changedetection" in your current user's home directory.
2. After creating our new directory, we must go to using the cd command as demonstrated below.
3. Using the nano text editor, we can start editing the "docker-compose.yml" file.
This file instructs Docker on how to configure one or more containers. This will be "changedetection.io" and the Chromium web driver in our instance.
4. Depending on whether you are using a 64-bit or 32-bit version of Raspberry Pi OS, you need add the lines below to this file.
The sole distinction between these two collections of code is that a 32-bit Raspberry Pi OS does not support the standalone Chrome browser that Changedetection.io demands.
Docker-Compose for 64-bit Raspberry Pi OS
Docker-Compose.yml for Raspberry Pi OS 32-bit
5. After entering the Changedetection.io setup information for your specific Raspberry Pi OS version, save your work and close the text editor.
By hitting CTRL + X, Y, and then the ENTER key in that order, you may save and close the programme.
6. Finally, by entering the following command into the terminal on our Raspberry Pi, we can launch Changedetection.io.
By executing this command, Docker will download and start all of the containers that are defined in our "docker-compose.yml" file.
The web interface for Changedetection.io
We can now access the Changedetection.io software's web interface now that we have installed it on our Raspberry Pi.
You will be given a brief overview and be shown how to access the web interface in this section of the training.
Using the Web Interface to Access
1. You have two options for accessing the changedetection.io web interface: directly from your Raspberry Pi or from a local device.
You may use the hostname command to determine your Raspberry Pi's local IP address.
Please be aware that Docker has generated a lot of unique IP addresses that you may see. Your device's IP address will often be the first one provided.
For instance, our Raspberry Pi's local IP address was as follows.
2. Once you have your IP address at hand, open your web browser and navigate to the following location.
The most important thing to note is that we are utilising port "5000" because changedetection.io does so by default.
If connecting locally, be sure to substitute "IPADDRESS" with either the IP address you obtained in the previous step or "localhost."
Utilizing the Changedetection.io Web Interface on your Raspberry Pi
3. The first thing you should do after opening the Changedetection.io web interface adds a website to watch for changes.
This is simple to accomplish right from the dashboard.
- The URL that you want your Raspberry Pi to check for updates should be entered first (1.).
- Next, you can optionally give this specific change detection observer a group name (2.).
- You may now choose to store this watcher right away (option 3.) by selecting the "Watch" button.
Alternatively, you can select to update advanced options (options 4.) prior to the watch beginning by selecting "Edit > Watch."
We'll presume that you wished to further set up the webpage change detector on your Raspberry Pi for the sake of the instructions that follow.
4. The "General" settings tab on the Changedetection.io web interface will be the first thing we examine.
You have control over specifics like the URL that should be checked for updates. The "Time Between Check" option is one of the important things you might wish to change.
You may choose the amount of time Changedetection.io will wait before determining if a change has taken place using this option.
5. The next tab is "Request." The choices on this page determine how the website change detector on your Raspberry Pi will submit its request.
Using the settings on this page, you may manage the headers and body that are used when a request is sent.
The "fetch method" is one of the important settings you might wish to change.
- The quickest approach to determine whether a change has been made to a website is to use a basic fast Plaintext/HTTP client. Being mindlessly grabbing the website and comparing the plain text makes it straightforward.
- Use the WebDriver Chrome/JavaScript option if the website you are testing needs JavaScript to render.
As an added benefit, when it does its inspection, Changedetection.io will also capture a snapshot of the website.
Please be aware that if your Raspberry Pi is using a 32-bit operating system, you cannot choose this option.
6. The "Filters & Triggers" tab will be the tab we examine next.
The parameters in this tab can be used to exclude certain materials or add more triggers. You may utilise these choices to disregard particular elements, such as one that is continually changing.
You may also configure the text to send a change notification. Only if that text or regex is discovered on the page will notice be delivered if the "Trigger/wait for text" option is enabled.
7. The "Notifications" tab, the last tab we'll look at, maybe the most significant.
You may choose where your Raspberry Pi should send notifications when it detects changes to your website using this tab.
On AppRise GitHub, you can learn more about the formats and supported URLs.
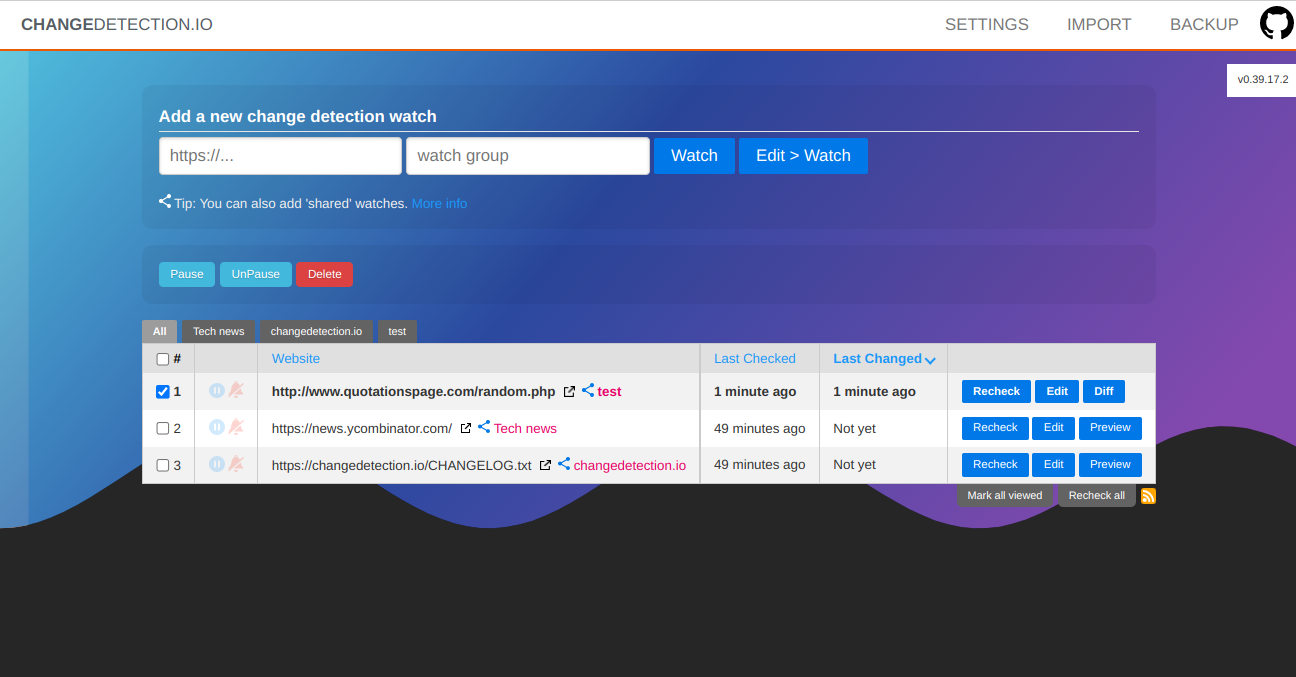
8. As you can see in the image below, Changedetection.io is now operating on our Raspberry Pi and is keeping an eye out for changes to the URL we recently added.
Conclusion
You ought to have the Changedetection.io programme running on your Raspberry Pi by this stage of the tutorial.
Using this programme, you can quickly determine if a website has changed on a regular basis.
If you experience any difficulties getting this website change detector to function on your device, kindly leave a remark below.


.png)


