Bullseye, the Raspberry Pi OS, has been updated.
Security is one of the topics on which we spend a lot of work here at Raspberry Pi. Unfortunately, cyber-attacks and hacking are on the rise, and Raspberry Pi computers are just as much of a target as any other, simply because there are so many of them out there today!
Raspberry Pi steadily increased the security of Raspberry Pi OS over the years, not in reaction to specific threats, but rather as a precaution. However, there is always a balance to be struck, since security advances normally come at the expense of usability, and Raspberry Pi attempted to make the system as user-friendly as possible while maintaining an appropriate level of security.
Until today, all Raspberry Pi OS installations featured a default user named "pi." This isn't much of a flaw; if someone wants to hack into your system, they'll need to know your password, and you'll need to have enabled some type of remote access in the first place. However, it might make a brute-force assault significantly simpler, and as a result, several nations are enacting legislation that prohibits any Internet-connected device from having default login credentials.
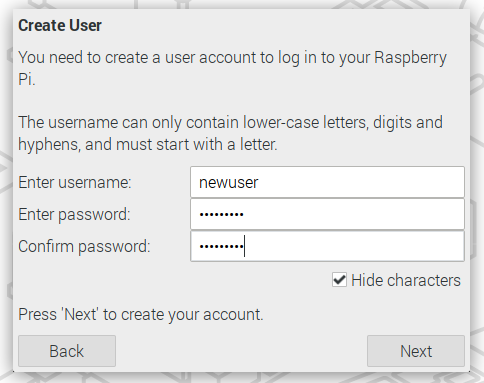
As a result, the default "pi" user has been deleted in this version, and you will need to create a user the first time you boot a freshly-flashed Raspberry Pi OS image. While this may cause a few difficulties when software (and documentation) anticipates the presence of the "pi" user, it seems like a reasonable move to make at this point.
Raspberry Pi Setup Wizard
By now, you should be comfortable with the Raspberry Pi setup wizard. It was released a few years ago and runs on the first boot, defining international settings, connecting to a wireless LAN, and installing any software updates; it also invites you to alter the default password. The wizard, on the other hand, has always been optional; if you pressed "Cancel" on the first page, it just disappeared, and you were not obligated to utilise it.
Working through the procedure is no longer optional because it is how a user account is established; you cannot log in to the desktop unless you create a user account. As a result, instead of operating as an application on the desktop, the wizard now starts in a specialised environment.
The wizard environment will appear when you boot a fresh image. You can't run any apps from here because the menu button and application launcher have been removed; the taskbar now just enables you to control volume and link Bluetooth devices.
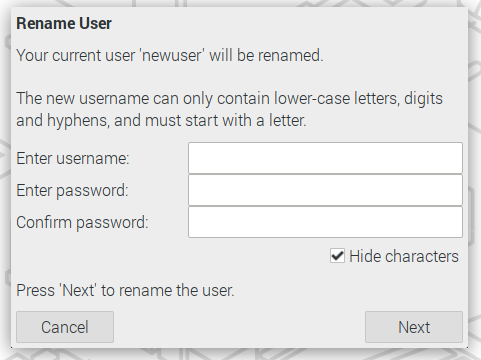
The process is substantially same as before, with the exception that instead of being requested for a new password, you will now be prompted for a user name and a password. (If you really want to, you may set these to "pi" and "raspberry" as before - you'll receive a warning saying it's not a good idea, but it's your option — some applications may require the "pi" user, so we're not being fully totalitarian here.) However, we strongly advise you to go with something else!)
The other options provided in the wizard have essentially remained unaltered. The only other difference is that if you have a second monitor connected, the page that allows you to apply compensation for monitors with overscan – a black border around the image – now has separate settings for both monitors, and changing the setting now takes effect immediately; previously, changing the overscan setting only took effect after a reboot.
The machine will reboot and the familiar Raspberry Pi Desktop will appear, signed in as the user you just established, after you reach the last page of the tutorial and push the "Restart" button. Everything will operate as usual from here on out.
You will still need to establish a new user account if you are running the Raspberry Pi OS Lite image, which does not include the wizard. When you first boot a Lite image, text prompts at the command line will ask you to register an account.
Raspberry Pi headless Setup
The Raspberry Pi Imager tool allows you to preconfigure an image with a user account for users who run their Raspberry Pi headless and so can't work through the wizard. When an image built this way is initially booted, it will pop up on the desktop, signed in as the user created in the Imager.
To preconfigure an image like this, click the "settings" button – the picture of a cogwheel – before clicking "Write," and use the Advanced options menu to specify a username and password, as well as any other preconfiguration you like, once you've picked the source image and destination in Imager.
Without utilising Imager, there are other ways to preconfigure a picture. Create a file called userconf or userconf.txt on the boot partition of the SD card to set up a user on first boot and bypass the wizard altogether. This is the part of the SD card that can be seen when it is mounted in a Windows or MacOS machine.
This file should only have one line of text, with username:encrypted-password – that is, your preferred username, followed by a colon, and then an encrypted representation of the password you wish to use.
The simplest approach to generate the encrypted password is to use OpenSSL on a Raspberry Pi that is already running — Activate a terminal window and type
echo 'mypassword' | openssl passwd -6 -stdin
Installations already in place
sudo rename-user
Bluetooth accessories
Just one more thing...
sudo raspi-config
echo $XDG_SESSION_TYPE
sudo apt update
sudo apt full-upgrade
sudo apt install rpi-wayland


.png)


