

Using a Raspberry Pi to mine cryptocurrency has long piqued Raspberry Pi owners' interest: having a low-cost gadget that consumes minimal power and can run 24 hours a day, 7 days a week to mine crypto while you sleep. In this post, I'll teach you how to configure your Raspberry Pi to mine Dogecoin, a cryptocurrency made famous by Elon Musk.

A miner and a mining pool are required to mine Dogecoin on a Raspberry Pi. On a Raspberry Pi, XMRig is an open-source miner that may be used to mine cryptocurrency. And unMineable is a fantastic mining pool that supports a wide range of currencies, including Dogecoin, Bitcoin, Ethereum, and others.
I'll walk you through how to set up this miner on your Raspberry Pi. To be honest, this arrangement isn't going to make you rich, but it will teach you how to use it. It'll be the same if you wish to test it on a larger computer running any Linux distribution later. Consider this instruction more of a learning opportunity than a chance to generate money.
Dogecoin Mining on a Raspberry Pi Requirements
Before you start mining Dogecoin on a Raspberry Pi, you'll need to meet three requirements:
- For best results, use a current Raspberry Pi model (good CPU needed).
- The miner must be installed on a 64-bit operating system.
- To connect the miner to the Dogecoin network, the miner will need to join a mining pool.
In this first section of the lesson, I'll go through these three processes in depth.
Choose a Raspberry Pi model that best suits your needs.
To boost their performance and make more money, most miners employ powerful computers with many GPUs. We can't use the GPU on the Raspberry Pi, so we're stuck with the CPU. A Raspberry Pi 4/400 will provide you greater results than a previous model.
Also, we'll need to install a 64-bit operating system (which will be the next step), so don't forget to test this on earlier models.
https://raspberrytips.com/
For this lesson, you may only utilize the following models:
- Raspberry Pi 2B, version 1.2 only
- Raspberry Pi Zero 2
- Raspberry Pi 3 or 3B+
- Raspberry Pi 4 or 400
- Raspberry Pi 4 Model B and Pi 400 will be recommended...
Install a 64-bit OS system on your Raspberry Pi.
- Install the 64-bit Raspberry Pi OS: We don't require a graphic interface, therefore the minimal version would suffice. This link will take you to a download page where you may get it. Choose the most recent version and save it as a zip file (something like DATE-raspios-bullseye-arm64-lite.zip). To put it on an SD card, use Raspberry Pi Imager or Balena Etcher.
- Install Ubuntu Server 64 bits: If you're familiar with Ubuntu or like to keep things simple, you may flash the server version of Ubuntu using Raspberry Pi Imager. Select "Other general-purpose OS" and then "Ubuntu" from the operating system drop-down menu. Choose the 64-bit server OS from the drop-down menu and flash it to your SD card.
- Other options: It doesn't really matter what operating system you use. For best results, you'll need a 64-bit operating system without an interface, if feasible. However, you have the option of using Manjaro, Fedora, Kali, and other distributions. You don't need to start from scratch if you already have a 64-bit operating system installed.
After you've prepared your SD card, start up your new operating system and set up the basics:
- If you need to customise the network or keyboard layout on Raspberry Pi OS, for example, you may use raspi-config:
sudo raspi-confi
- After that, you should upgrade all of the packages to the newest version with:
sudo apt update
sudo apt full-upgrade
Get yourself a Dogecoin address.
This may or may not be required, depending on the mining pool you select. However, if you're serious about doing this (particularly if you're going to attempt it on another computer after testing on your Pi), you may acquire a DOGE address by following the steps on the official page.
An address can be made in a variety of ways. I achieved it by installing Dogecoin Core on my PC, although I'm not sure that's the most convenient method. The programme is large, and with a fibre connection, synchronisation takes many hours. I believe that utilising the Android app or the lite version (Multidoge) on a PC is a better option.
Anyway, here's how to generate a Dogecoin core address:
- Install the appropriate programme for your operating system.
- To begin, open the app. It will begin the synchronisation process, but you do not need it to be completed in order to obtain an address (it is just necessary to view your current amount and send coins).
- Fill complete the form by clicking "Much Receive." Although all fields are optional, I recommend adding a label, such as "Raspberry Pi mining address."
- In the table below, a new line will be added; choose the line and click "Show" to receive your address:

DAuARerBnjJE9rs7MoaM75nSpfdx5GGjK6
Look for a mining pool.
- Go to their website and choose Dogecoin from the list of coins (Here is the direct link).
- You'll see Ethash, Etchash, Kawpow, and RandomX as choices. We'll utilise the CPU option: RandomX because we don't have a graphics card.
- Take note of the global server's URL and port by clicking on RandomX. The URL is rx.unmineable.com at the time of writing: 3333
- The following is an explanation of how to establish your user field:
What is the best way to mine Dogecoin on a Raspberry Pi?
Here is the procedure to install XMRig on your Raspberry Pi:
- Install the prerequisites:
sudo apt-get install git build-essential cmake libuv1-dev libssl-dev libhwloc-dev - Clone the GitHub project on your device:
git clone https://github.com/xmrig/xmrig.git - Create a new folder and go into it:
mkdir xmrig/build && cd xmrig/build - Start the compilation:
cmake ..
make -j$(nproc)
Set up XMRig to mine Dogecoin using unMineable settings.
You can download the template available on their GitHub project with:wget https://raw.githubusercontent.com/xmrig/xmrig/master/src/config.json
- Open the file with nano:
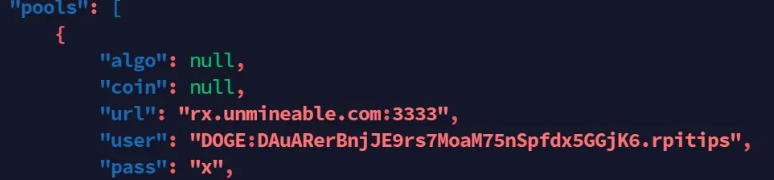
nano config.json - Find the “pools” section, you’ll need to change the values for the “url” and “user” configuration variables.
- Put your mining pool address in the “url” field, so if you are using unMineable it should be:
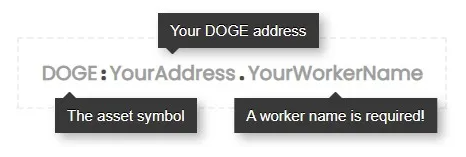
rx.unmineable.com:3333 - Then fill the “user” field as explained on the website:
DOGE:<address>.<worker_name>For example:DOGE:DAuARerBnjJE9rs7MoaM75nSpfdx5GGjK6.rpitips
- Save and exit (CTRL+X).

Begin the mining process.
./xmrig
Conclusions and final thoughts
Examine your outcomes.


.png)


