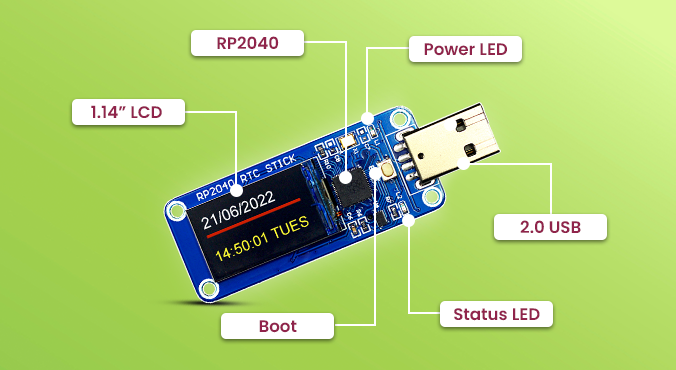
EncroPi is a multipurpose USB stick that is incredibly small, portable, and allows you to perform customized security to secure your data using symmetric and asymmetric encryption types. EncroPi is also built with a real-time clock that can be used to keep accurate timekeeping even if the device's main power source is disrupted.
EncroPi has a built-in Raspberry Pi RP2040 microcontroller that supports up to 16MB of off-chip Flash memory over a dedicated QSPI interface and has two quick cores, and plenty of on-chip RAM, and a port of TensorFlow Lite.
Let's discuss how to program EncroPi. You don't need to be a tech whiz to use EncroPi, so don't worry, I'll cover it for you. Using basic programming, you can quickly design real-time clocks, custom encryption, and other things. All of these codes, along with instructions on how to utilize them, will be made available by SB Components, the project's manufacturer, after the Kickstarter campaign has concluded. EncroPi employs MicroPython and CircuitPython, which are simple to comprehend nowadays. You can also find the learning page quickly to get started with programming. For now, let's get started with building a Real-time clock on EncroPi.
Small Introduction to EncroPi
You don't need to bother about programming because EncroPi is compatible with several hardware single-board computers (Raspberry Pi Board, Jetson Nano, etc.), Windows, Mac, etc.
Also Check:
- Introducing EncroPi - Explore Data Logging with Security Encryption & Real-time Clock
- EncroPi, a smart RP2040 Based Device with a variety of additional functions, has been introduced
- EncroPi - Create USB Encryption & Customize Encryption Algorithm with Real-time Data using @CircuitPython
Steps:
- Install Thonny on your device; in this example, we're using a Raspberry Pi 400 computer, but you may use any single-board computer, Mac, or Windows PC.
- As seen in the image above, a Raspberry Pi 400 is connected to EncroPi through USB.

- You can download Thonny from this link and install it.
- Utilizing Python, execute the following programs on Thonny:
from machine import I2C
import time
import utime
from machine import Pin, UART,SPI
import time
import st7789

import vga1_8x16 as font1
import vga1_16x32 as font
import vga1_16x16 as font2
address = 0x68
register = 0x00
#sec min hour week day month year
CurrentTime = b'\x00\x50\x14\x05\x21\x06\x22' #00:00:10 friday 03/03/2022
week  = ["Sun","Mon","Tues","Wed","Thur","Fri","Sat"];

bus = I2C(1) # i2c 1

spi = SPI(1, baudrate=40000000, sck=Pin(10), mosi=Pin(11))
tft = st7789.ST7789(spi,135,240,reset=Pin(12, Pin.OUT),cs=Pin(9, Pin.OUT),dc=Pin(8, Pin.OUT),backlight=Pin(13, Pin.OUT),rotation=1)


def PicoRTCSetTime():
    bus.writeto_mem(int(address),int(register),CurrentTime)

def PicoRTCReadTime():
    return bus.readfrom_mem(int(address),int(register),7);

def info():
    tft.init()
    utime.sleep(0.2)
    tft.text(font,"RP2040 RTC", 15,20)
    tft.fill_rect(15, 60, 210,10, st7789.RED)

    tft.text(font,"Real Time", 15,70,st7789.YELLOW)
    tft.text(font,"Clock", 15,100,st7789.YELLOW)
    tft.fill_rect(15, 140, 210, 10, st7789.BLUE)
    time.sleep(2)
    tft.fill(0) #clear screen

info()

PicoRTCSetTime() #You can remove this line once time is set

while 1:
    data = PicoRTCReadTime()
    a = data[0]&0x7F  #sec
    b = data[1]&0x7F  #min
    c = data[2]&0x3F  #hour
    d = data[3]&0x07  #week
    e = data[4]&0x3F  #day
    f = data[5]&0x1F  #month
    g = data[6]&0x3F #year
    #dt = "20%x/%02x/%02x %02x:%02x:%02x %s" %(g,f,e,c,b,a,week[d-1])
    t = "%02x:%02x:%02x %s" %(c,b,a,week[d-3])
    d = "%02x/%02x/20%x"%(e,f,g)
    print(t) #year,month,day,hour,min,sec,week
    print(d)
    tft.text(font,d, 15,20,st7789.WHITE)
    tft.fill_rect(15, 60, 210,10, st7789.RED)
    tft.text(font,t, 15,80,st7789.YELLOW)
time.sleep(1)- You will receive the results shown in the video below:
As long as your coin cells are functional, save these files on your EncroPi and rename them to "main.py" so that each time you connect it to USB, it will display the current date and time. :)
Visit EncroPi Official Page for more
Enjoy!


.png)


